Afternoon Delight... yes, that's the name of my new quilt! I'm a few days late in posting (assuming I post on the first of each month), but I have SO much to show you, and I certainly wanted you to see Afternoon Delight -- but I didn't finish putting the borders on, in time. I also wanted to include pictures of the blocks in this quilt, and it took me quite a while to tweak them for this blog. But here I am, blog and all! This month I'll show you my new quilt, lots of blocks, a new design I'm working on, progress on quilting Sarah's Revival, MORE blocks -- and another new quilt I've started. I aim for my posts to both educate and inspire all of you -- to try something new, to design something different, to learn something new, to have more fun... and to love quilting as much as I do!
So what have I been working on over the past month? My guild's auction was three weeks ago and I'm still recovering (I chaired it). One of the things I realized, though, was that we had fewer block sets in this year's auction than in the past. Many of our block sets come from a lottery we hold each month -- we invite members to make blocks, with half of them going into a lottery that one person wins and half of them going into the annual auction. I'm already getting ready for next year's auction by making big block sets. We all need to consider how we'll support our guild - which means more than just cleaning out a drawer and donating junk! So I started off by making 35 simple Evening Star blocks on a white-on-white background. These are fast and easy to make - especially since I make and print paper foundations for all the star points. Whee!

I also made 35 King's Crown blocks. These are just as fast as Evening Star blocks -- think about it: they have the exact same units, just inverted!

Hopefully someone will put in a good bid on all of these blocks. If you want the pattern for piecing these, here it is:

And then I made a stack of 44 Pinwheels on Parade blocks. These are just TOO fast and simple to make! They chew up scraps like crazy -- and so making these blocks and donating them to the guild is doing me a favor. I'm using up scraps, cleaning out my sewing room, and helping the guild, all at once. And honestly, these are SO fast and simple to make that it's crazy NOT to whip up a stack.

And look how they look together -- wouldn't they make a fast and simple quilt? Once you cut out the rectangles and squares, it takes about 6 minutes to flip-and-sew each block. They are so fast and fun - and they are extraordinary scrap eaters!

Have I gotten your attention yet? If so... here's the pattern for these blocks, too!

Okay - so much for making blocks. What happened to all those blocks I showed you last month -- remember them?

I had made all of the double Nine-Patch blocks and Butterfly blocks (also known as a modified Shoo-fly or a Prairie Queen block) and started on a set of applique blocks. Once I finished those, I put some of them up on my wall... and didn't like the layout at all.

I want to take you step-by-step through my "design process" so that you can get an inkling into how I design quilts. Some of it is intuition, some of it is hit-or-miss, some of it is experience, and a lot of it is just trial and error! I originally wanted this quilt to be an edge-to-edge set of blocks -- no borders at all, just an overwhelming array of scraps! In the above layout, each diagonal row has a different kind of block -- 9-patches, applique, shoo fly... but it didn't look right. Back to the drawing board. And so I laid out all of the blocks on the floor, edge-to-edge, as planned... with every ODD row being the 9-patch blocks. YES! It worked. Well, sort of. I thought that without a border of some kind, the quilt just looked a little "flat." No spunk. No drama. And yet I didn't want to add a big border around the quilt - it would have made the quilt way too big. What to do?


Now, to "evolve" the border a bit more -- the setting triangles needed a border around them.

I tried several different border options: first, I made a little strip of squares on point (these are all 3/4-inch squares in the quilt). I didn't like how they looked -- they made the outer chain of squares look like a rectangle, which was distracting. Scratch that idea....
Next, I thought I'd just add a little cheddar-colored floater. I love cheddar and red together. Hmmm... Nope, it just didn't do the trick - at least not with this red fabric...

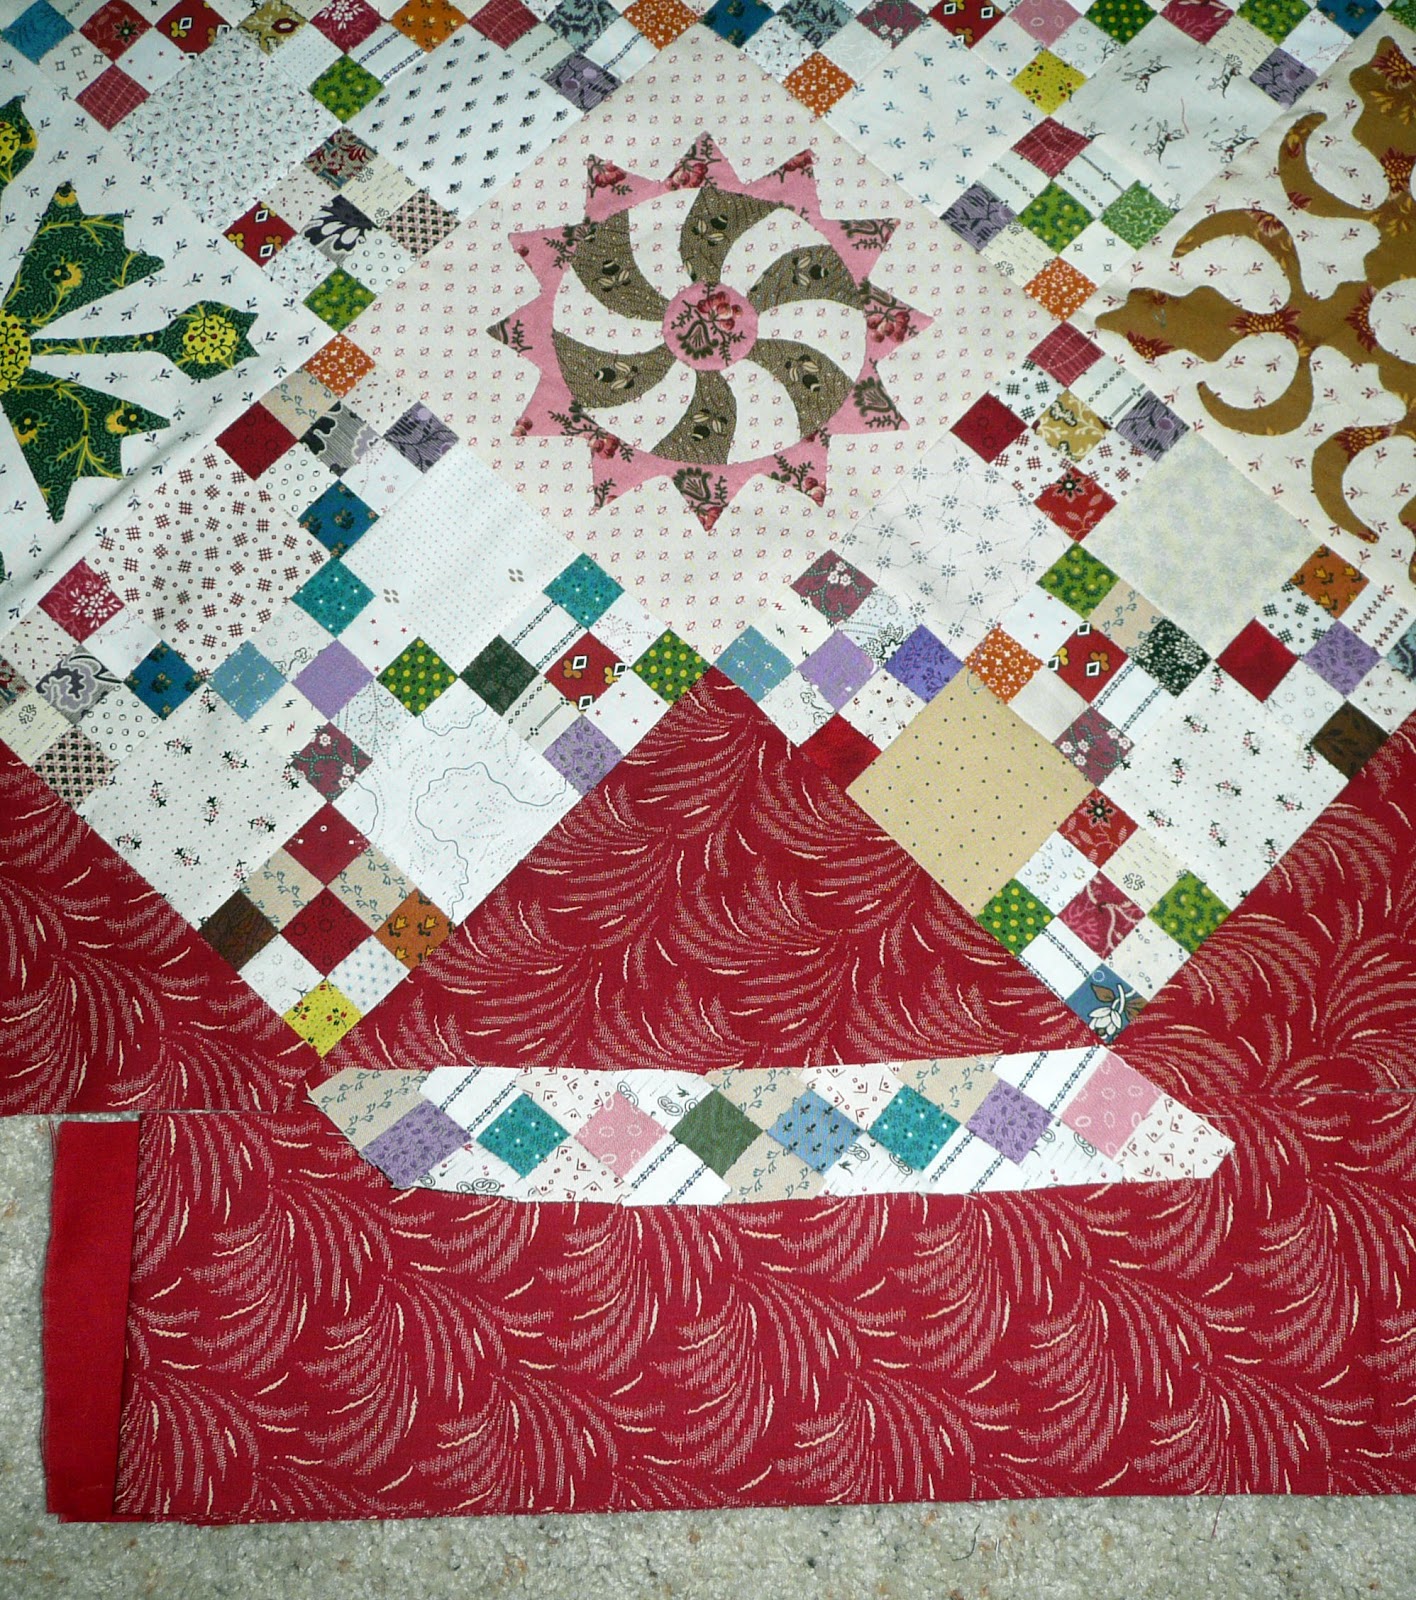
Okay - so what about a striking black floater strip? I auditioned several different black fabrics... and now I'm happy!

I stitched on the outer border with a little black floater strip of black -- I chose a solid black because I felt like it was the most striking. It wasn't what I thought I'd like, initially, but I never rule out anything until I'm certain it won't work. So... here is Afternoon Delight! I've since sewn down the mitered corners and now I have to think about how best to quilt this quilt. I'll do it on my long arm machine; I have too many hand-quilting projects in line to think about hand-quilting it right now.


Whew -- are you tired of looking at blocks, yet? Here are my two favorites:

And my second two favorites:

I know I'll get questions... so, no, I do not know when the patterns will be available. It will take me at least two weeks to draw up all the patterns and write up all of the instructions - and I need to take a decent photo of the whole quilt. Then Quakertown Quilts (my distributor) will take the master patterns, test the instructions, order fabric, and start offering them for sale -- and other quilt shops can pick up the patterns wholesale at that time, too. So if you're interested, ask your local quilt shop if and when they might have the quilt patterns available for you!
In the meantime, this has been a very busy month, as you can probably tell. My dear mother passed away and I have spent time sorting, cleaning, reflecting, and cleaning things out. I decided that I needed a new project -- and needed a plan for using more fabric; I'm the first to admit that I have way too much (ouch - it hurts to even think that!). My first step was to gather my 1930s reproduction fabrics and put them all together. I've wanted to use them in something new... and maybe this was the opportunity. Not too bad - only one box full.

I redrew one of the patterns I used in Afternoon Delight and have already cut out all of the pieces and basted them in place for 9 blocks total, though I only show four here -- and I'm making a new quilt using these crazy swirling, whirling blocks. I had forgotten how "happy" 1930s fabrics are! The blocks will be surrounded by multiple cheery borders. I'm in love with piecing, once again.

Some of the blocks have three fabrics in them (I'll applique circles across the center of these, in case you're wondering!)...

And some of them have only two fabrics in them -- the outer circle is inverted and the inner swirls leave the background fabric peeking through.

This quilt is going to be a LOT of fun to make -- and quick, too. Since I finished all the blocks for Afternoon Delight, I needed a new take-along applique project and this fit.
I think I forgot to show you this quilt from last month -- a dear friend's daughter had a baby; they live in Switzerland, but have roots in Texas. So little Heath got a cowboy quilt; they were affectionately calling him "Tex" before he was born, so this was entirely appropriate! I bought these blocks on eBay several years ago, thinking they were so cute. Finally... a great use for them!

So I bet you're wondering what I have been doing in my spare time, right? Remember Sarah's Revival? Here it is... to refresh your memory. I'm hand quilting it.

I am quilting it row by row on my long floor frame... here was row one... from earlier this year.

Hand quilting, for me, is therapy. It calms me, gives me time to think and plan other things... and oh, yes, lets me watch all kinds of mystery movies on television. So here is how I'm quilting all of the blocks: simple cross-hatching.

But now that I'm at the center of the quilt, with those four unique blocks, I thought I might want to do something different. I'm sharing my thought process in deciding on a quilting pattern in these next photos so that you can think about how to figure out what to quilt in your own quilts. I really thought that these four center blocks would be a great opportunity to perhaps insert a different quilting design. But what? My painters' tape is there as if I'm about to start cross-hatching... but was that what I really wanted? I thought not.

Whenever there is a quilt shop or quilt show where they sell quilt templates, I try and buy 2 or 3. I now have a large collection of them - they provide me with lots of options. I looked through my templates and thought that maybe this large template would be a good one to place across those center blocks.

That template didn't work out when I laid it on the blocks -- it was too small and the scale was not right. I tried this one (below), next - it was larger and the scale was larger, too - and I liked the double wreath.

I laid it across the blocks and thought it looked pretty darn good. I marked the quilting lines on my quilt top and started quilting away. By the time I finished quilting one block with the feathered wreath, I knew I'd made a mistake. The featheres just didn't show up against all of the applique. Phooey! I unstitched all of that hand-quilting and rethought what I wanted on those center blocks.

What about a smaller motif in each corner, with cross hatching in the rest of the block?

Hmmm... nice idea, but when I laid it down on the block, the applique overwhelmed it. No luck there.

So what did I finally decide to do? Back to basics: good, old-fashioned, plain - but elegant - cross-hatching. One more decision finalized. But can you see, now, how my thought process works? You can do the same thing -- just try one thing, then another and another. Your instincts will lead you to the right conclusion.

I wanted to note something here. On a pole frame, there is no basting of the quilt top, batting, and backing. The tension on the frame holds all the layers in place. BUT and this is a big BUT... when I use wool batting, its puffiness lets the top "slide" as I quilt the quilt, leading to "mini-volcanoes" on the quilt top, if I'm not careful. How do I compensate for this problem? I use big corsage pins and, in essence, "pin baste" the quilt while it's in the frame. It's an odd thing to do when the pole frame is supposed to eliminate the need for basting (and it does, for the most part)... but it works. Check out the pins in the photo below...

And here's a better photo, where you can see the pins -- and me hand-quilting -- and see how quilting pushes up these little mounds that need to be pinned down. We all need to develop "coping mechanisms" for various issues, and this works for me.

Okay, now I know you are STILL asking... what do I do in my spare time? Well... I love making blocks and especially when I don't have to do all the designing. In fact, I don't even have to think much with this project: Barbara Brackman has started a new online block-of-the-week. You can find it here: www.grandmotherschoice.blogspot.com. Each week for 49 weeks, Barbara will post a new block, along with recollections of the fight for women's rights. It's a subject dear to my heart - while my daughters do not have the same struggles as women of my age did in the corporate arena, we still live in a world where many women do not have the same opportunities that we do now. As a senior NASA executive, I was fortunate - the agency I worked for had many top-notch, well-recognized, and well-rewarded females. I want those same opportunities for all women. So... I'm joining in with this block of the week. I decided that I'd make my blocks using more of those 1930s fabrics; I certainly have plenty and they need a home other than the box they are in. Here is my first block:

I am making paper foundations for all my blocks, and once you make one foundation, making more blocks is simple. So... I decided I'd do a set of blocks in 1930s AND civil war fabrics. Why not? I certainly have lots of scraps AND yardage. So here is the first in my second set of blocks:

Uh-oh... this block was just too easy. Way too easy. I decided that I needed a home for my plaids, too. Why not make a set of these blocks using plaids? It's different... and sort of fun to use plaids with cream/tan backgrounds. So here's the first in my third set of blocks:

BUT WAIT, WAIT... THERE'S MORE! I decided that as long as I was making one set of these blocks in three color ways... why not make TWO sets of these blocks in the three color ways? That way, I can give my guild one set in each color way, for the guild's annual auction, and keep one set for myself! So... here's my two-fer of each set; this is way too much fun!!!


I just hope that Barbara's blocks continue to be fairly simple or I'm going to be in big trouble in trying to stitch 6 blocks a week! Oh well... I'll just have to use a little more of my spare time. Ha!
So what else am I working on? Yes, yes, there's more. A friend of mine, Winnie Fleming, teaches a class called "Ultimate Borders." And it is THE ultimate in classes I've ever taken! She is a superb teacher and more than superb as a designer. In the class, which meets 4-5 times, several weeks apart, she gives instructions for making a border quilt. At each session, we are given three options for the next border; I love the fact that everyone's quilt will look entirely different. I started my quilt, as I do almost all my quilts, by gathering all the fabrics I wanted to use and putting them in a bin. It saves a lot of time because whenever I want to add a new border or set of blocks to a quilt, I just go to the bin instead of "The Closet." The choices are more limited, which is fine, because I spend far less time hunting down the perfect fabric. Here's my bin: reds, greens, golds, and off-white.

We were given three options for our center block and I chose to make a Lone Star. Here's mine -- 19-1/2 inches square.

Here is the focus fabric I used (you can't see it in the bin of fabric, but it's in there!), which I'm going to use for making setting triangles; the lone star will be set on point. The red/gold fabric will be my floater between the star and the setting triangles. Each month, I'll keep you posted on my progress on this quilt. I can't wait to see it myself!

Okay... are you worn out yet? I've obviously been spending some time in my sewing room this month -- guilt is driving me to figure out how to use up all the fabric I have in there (as well as a love of quilting!), so I've been trying to be more focused on what I do every week. I still have a LOT of time to play, be with family, take care of grandchildren, garden in the yard, visit with friends, go to movies, shop, run around... so don't think that my life is totally consumed with quilting. Just enough that I can avoid doing much cooking... and just enough that the rest of the house doesn't get very messy. Life is good!
Happy quilting --
Sue
PS... just a reminder. IF you choose to copy my blocks ANYWHERE, please give me credit. These are all my own designs, unless noted otherwise. And DO remember.... these are COPYRIGHTED designs!
(c)2012 Susan H. Garman

